Diagnose It Right the First Time
Lesson video in production
The full lesson text below is complete — the video version lands with launch.
The difference between a $23 hour and a $60 hour in this trade is almost entirely diagnostic accuracy. Guess wrong and you buy a part you cannot return, burn a second visit, and eat a callback. Diagnose right and the same job is one visit, one invoice, and a review that says "found the problem in twenty minutes."
Here is the method, in order, every time. It comes from the training canon of the trade and from operators who do this daily.
Step one: interview before you touch
The customer's description contains half your diagnosis. Ask, then listen.
"Walk me through what happened. What was it doing before it stopped? Did anything change, a noise, a smell, a power outage? Has anyone worked on it recently? How old is it?"
"Dryer runs but doesn't heat" and "dryer died completely mid-cycle" point at different components. "It got loud last week and then stopped" is a bearing story. Write the answers down; a symptom described accurately is worth an hour of testing.
Step two: identify the machine
Find the model and serial number before you open anything, and photograph it. The model number gets you the wiring diagram, the parts list, the service bulletins, and the exact replacement part. Where these numbers hide on each appliance family is covered later in the course, because they hide well.
Step three: reproduce the fault
Run the machine and observe the failure yourself. A fault you cannot reproduce is a fault you cannot claim to fix, and intermittent problems, the ones that only act up on Tuesdays, are the most misdiagnosed jobs in the trade because the temptation is to swap the most suspicious part and leave. Document what the machine does and does not do: drum turns, no heat; fills, never agitates; compressor runs, no cooling.
Step four: inspect, then test in order
With the machine unplugged, do a careful visual pass: burned connectors, broken wires, jammed pumps, lint packed where lint should not be. Then pull the wiring diagram, which lives inside the machine or a parts site, and test components in the order the circuit demands, using your multimeter for continuity and resistance and your amp clamp for current draw.
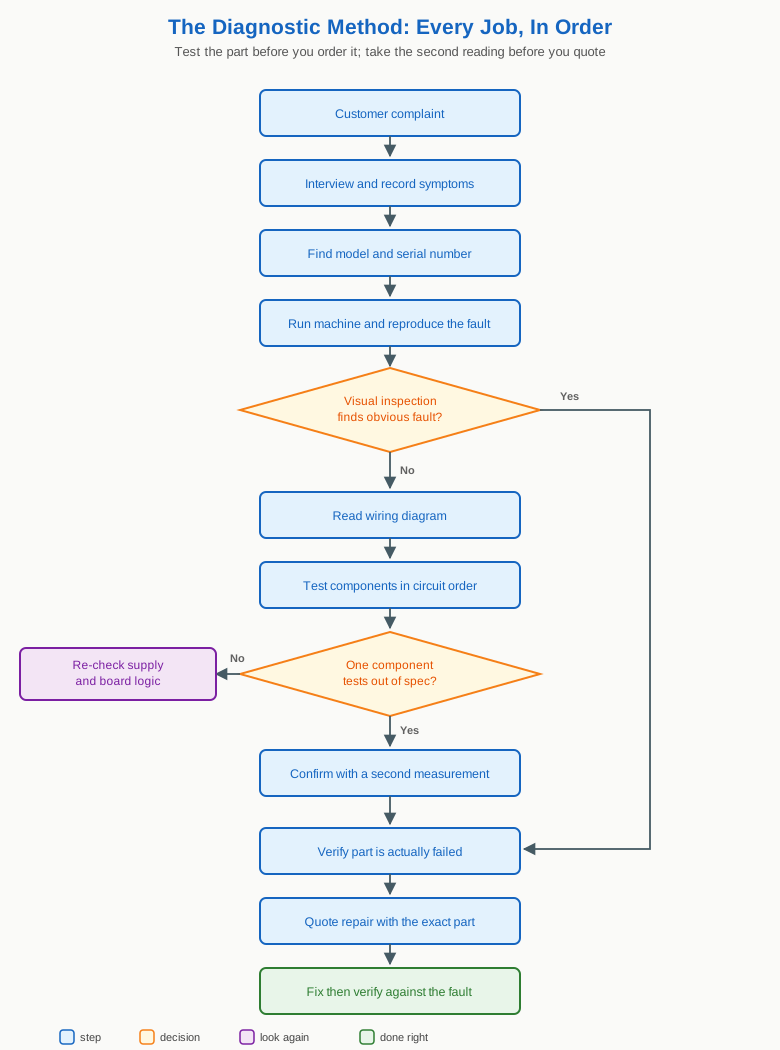
Two habits in that flowchart carry most of the value. Test the part before you order it; a continuity reading on the suspected component either condemns it or frees you to look elsewhere, and it costs you ninety seconds. And when a measurement indicts a component, take the second reading before you quote. Multimeter leads slip, and a misread resistance has sent many technicians to the parts counter for a part that was fine.
Step five: isolate when the system confuses you
When two readings disagree with the symptom, isolate subsystems. Disconnect the suspect component and test it alone on the bench. Compare a questionable reading against a known-good component when a twin machine is available, a second burner element, the paired washer lid switch. Isolation is slower, and it is how honest technicians escape the trap of replacing three parts to fix one fault.
Step six: verify the fix, then document
After the repair, run the machine through a full cycle, not a thirty second victory lap. Watch it reach temperature, spin, drain, ignite. Document what you found, what you replaced, and the readings you took, both for the warranty file and for your own pattern library: six months of notes on models and failures becomes a private database that makes you fast in ways no course can.
The whole method rests on one discipline: never order a part you have not proven bad. How parts actually get from a warehouse to your customer's kitchen is the practical question that follows.
Downloads for this lesson
Keep going — you're working through Start an Appliance Repair Business.
All courses are free ↗